From WAX to Polygon
One of the major challenges of blockchain technology, besides decentralization and governance, lies in the interconnection between blockchains. Being able to move tokens, whether Fungible Tokens (FTs) or Non-Fungible Tokens (NFTs), between different blockchains offers numerous strategic and economic advantages for these assets.
MyCloudWallet, the main wallet provider for the WAX blockchain, has developed a bridge that allows transferring FTs and NFTs between WAX and other EVM-type chains (Polygon, BSC, etc.) and Solana.
This tutorial is aimed at NFT collection owners who wish to use this bridge. If you are only a collector, you can only use the bridge if the collection owner has completed the bridge registration procedures by following the steps we will explain below.
But first, there are some prerequisites to meet.
Prerequisites
As mentioned, only the collection owner can register the bridge.
It is necessary to have a wallet on both the source and destination blockchains. For example, if we are going to register a bridge from WAX to Polygon, the WAX wallet will be the one listed as the collection owner. Additionally, we must create a wallet in Polygon to carry out the transactions.
Note: On EVM blockchains, NFT collections have their own wallet address, which does not necessarily match the wallet address used to sign transactions. That is, while on WAX we use the same collection wallet to sign, on Polygon we use our user wallet to sign, and the collection has its own wallet address.
One of the advantages of WAX compared to most blockchains is the low cost of transactions and its unique CPU/NET staking system using WAX. This allows us to make transactions without worrying about balances or fees. However, on chains like Polygon, transactions will incur GAS fees, which, although very low, will require us to have some balance in our personal wallet. We only need to transfer a few Matic from our favorite exchange to our wallet. During the practical actions I carried out while writing this tutorial, the GAS cost of each transaction was approximately $0.01.
Bridge from WAX to other blockchains
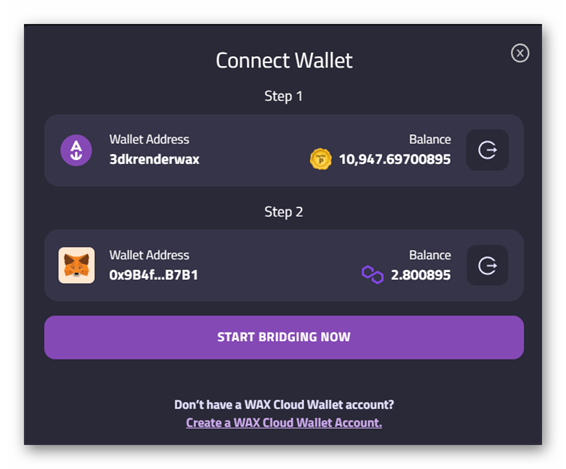
Login and Wallet Association
The first step is to log in to the The WAX NFT & Token Bridge portal (https://bridge.mycloudwallet.com).
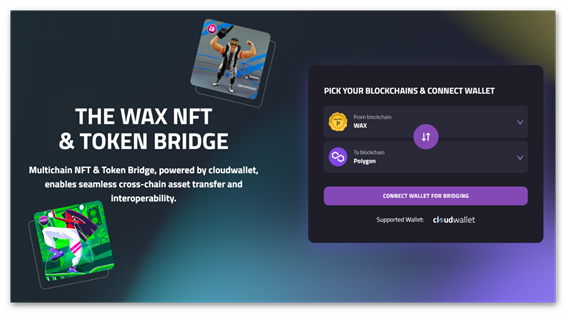
First, we log in with the collection owner’s wallet on WAX, and then we log in with the destination chain wallet we will use. In our case, we have chosen Polygon.
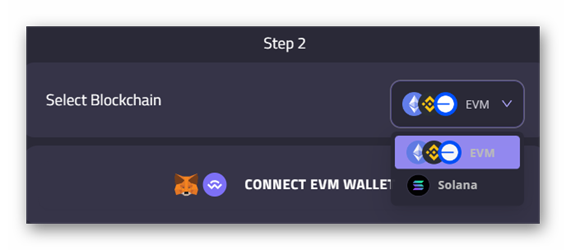
Since it is an EVM-type chain, we will ensure it is selected:
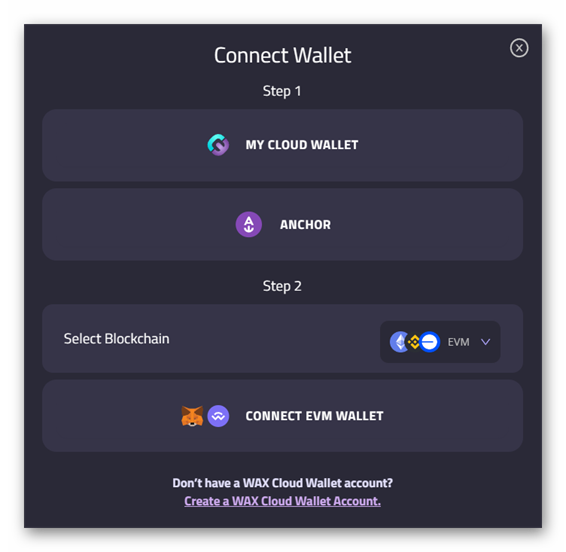
We will select the wallet we will use for the association. The available wallets listed include Metamask, Coinbase Wallet, and some other widely used ones.
Once we have associated the WAX wallet and the EVM wallet, we can start the bridge process.
The website shows us a page with a menu at the top that allows us to:
- Bridge FTs
- Bridge NFTs
- Configure collections To use the bridges, they must first be configured and registered, so let’s go with the configuration option.
Collection Configuration
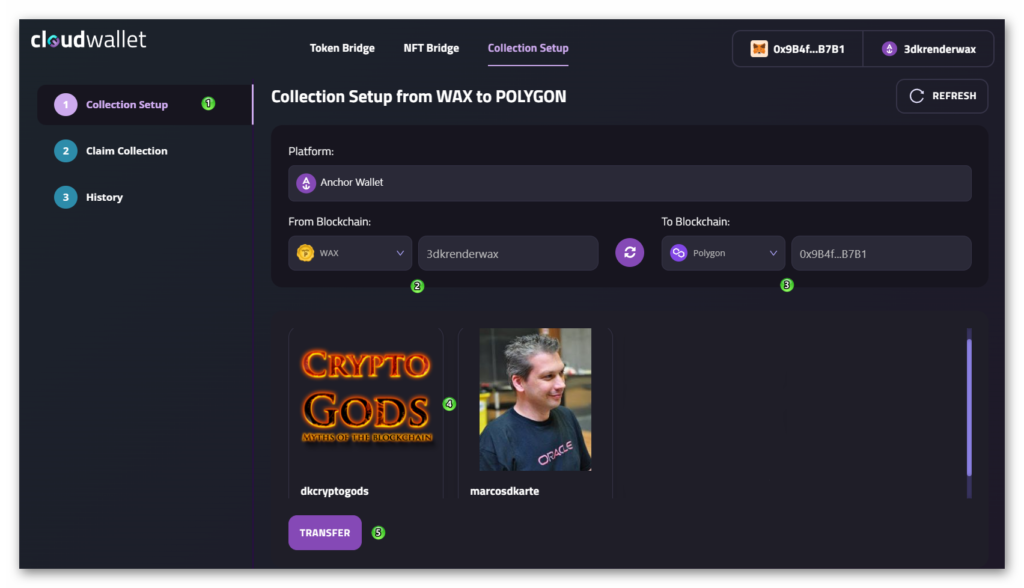
- In the left menu, select the first step; Collection Setup (1)
- Verify that the source chain is WAX with the wallet owning the collection (or collections, if we have more than one) (2)
- Also, check that the destination chain is selected with the wallet that will sign the transactions (and must have a balance to pay the fees) (3)
- Select the collection we want to register (4)
- And click “Transfer” (5)
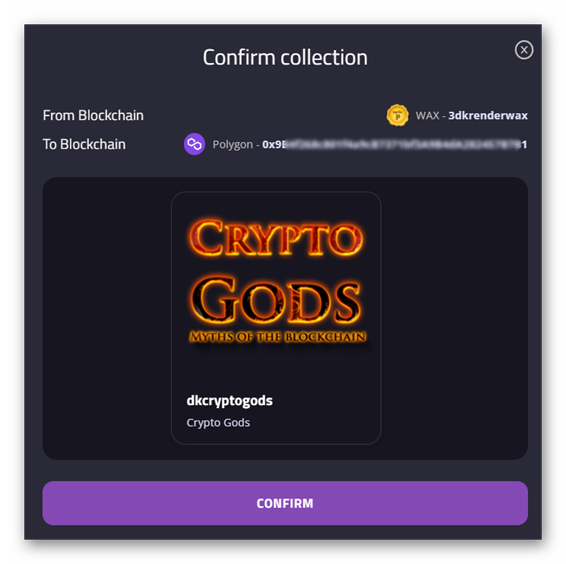
We will need to sign a transaction on the WAX chain to authorize our collection for bridge use and register it. This transaction consumes CPU/NET from the WAX wallet.
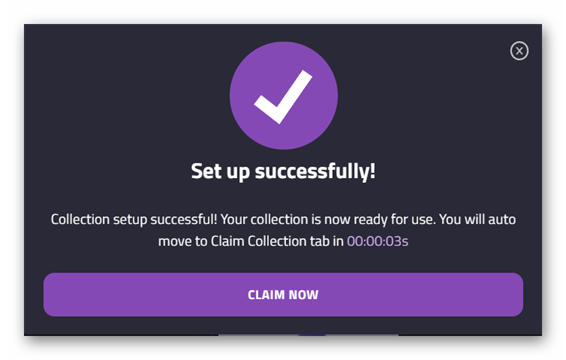
The collection is registered, but it still needs to be claimed on the destination blockchain for use. Depending on transaction processing times, we may need to wait several minutes.
Select the second option in the left menu: Claim Collection.
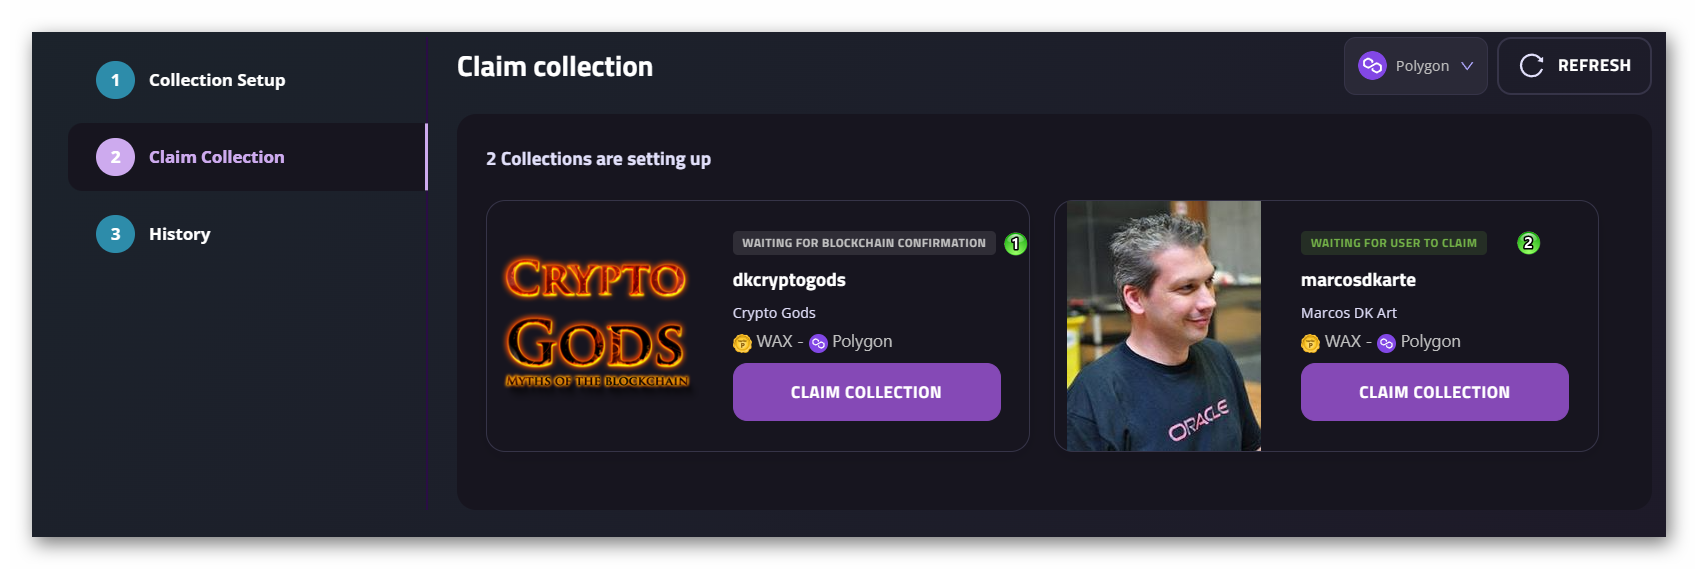
In the previous screenshot, I configured 2 collections to show their status.
- The first one is still awaiting confirmation on the blockchain and we cannot claim it yet (1)
- The second one is ready to be claimed (2)
Once we have claimed the collection, it is available on both sides of the bridge.
Transfer NFTs
It is time to start transferring NFTs from WAX to Polygon.
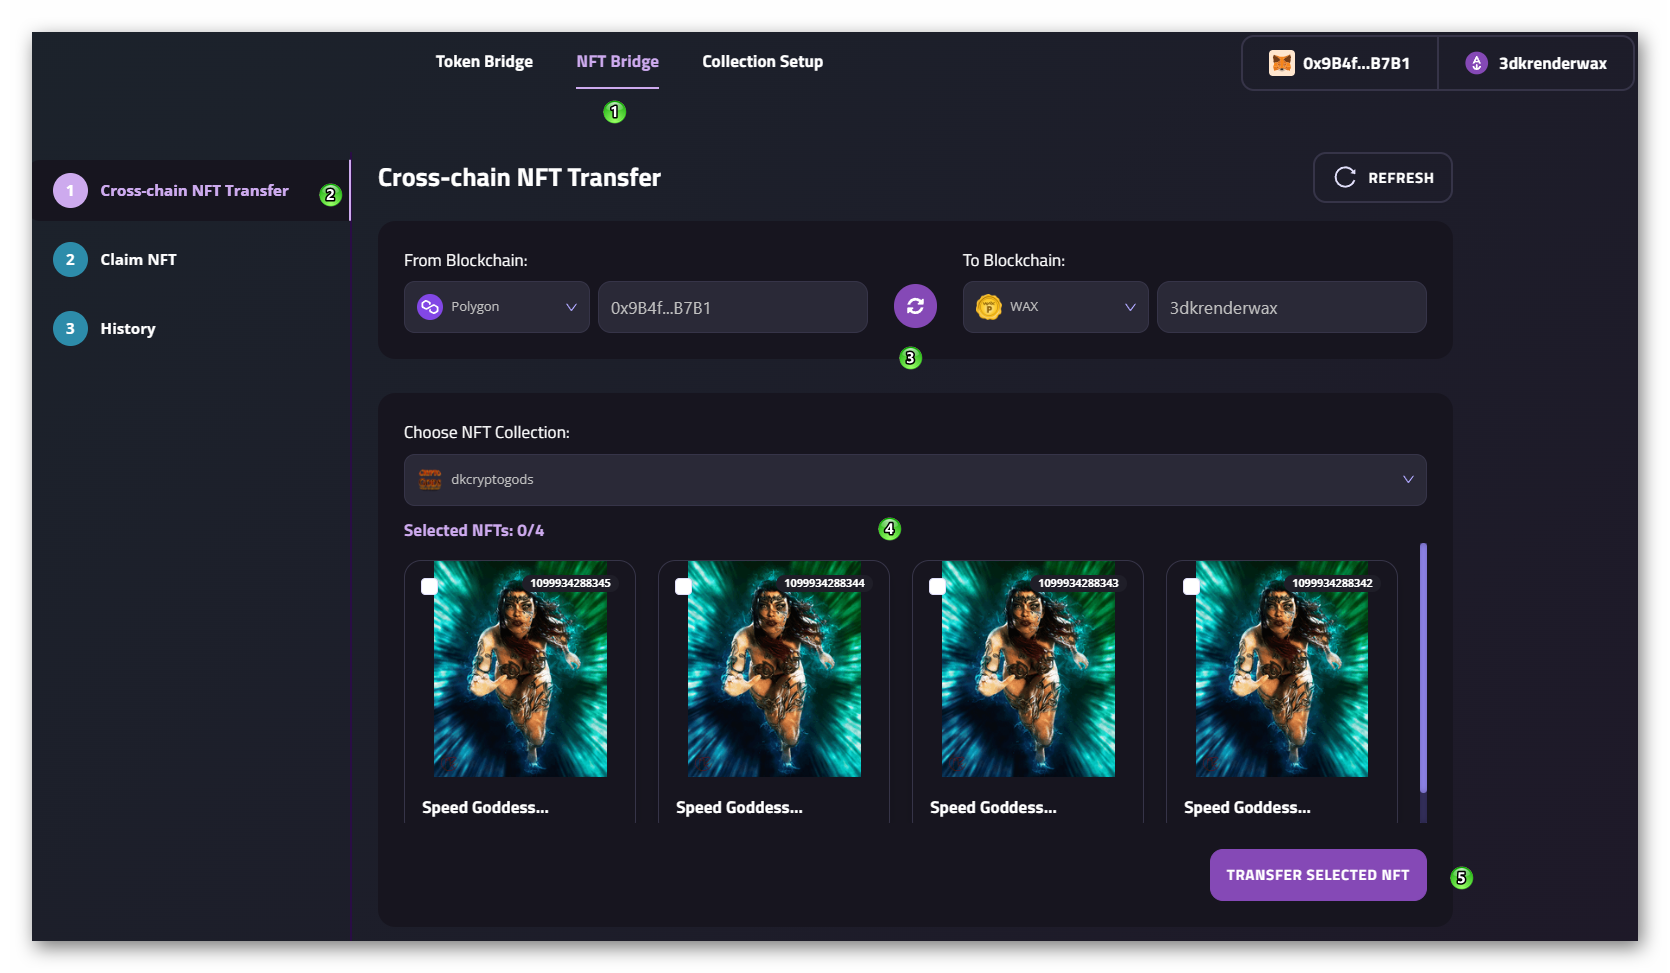
- Select the NFT Bridge option in the top menu (1)
- Select the Cross-Chain NFT Transfer option in the side menu (2)
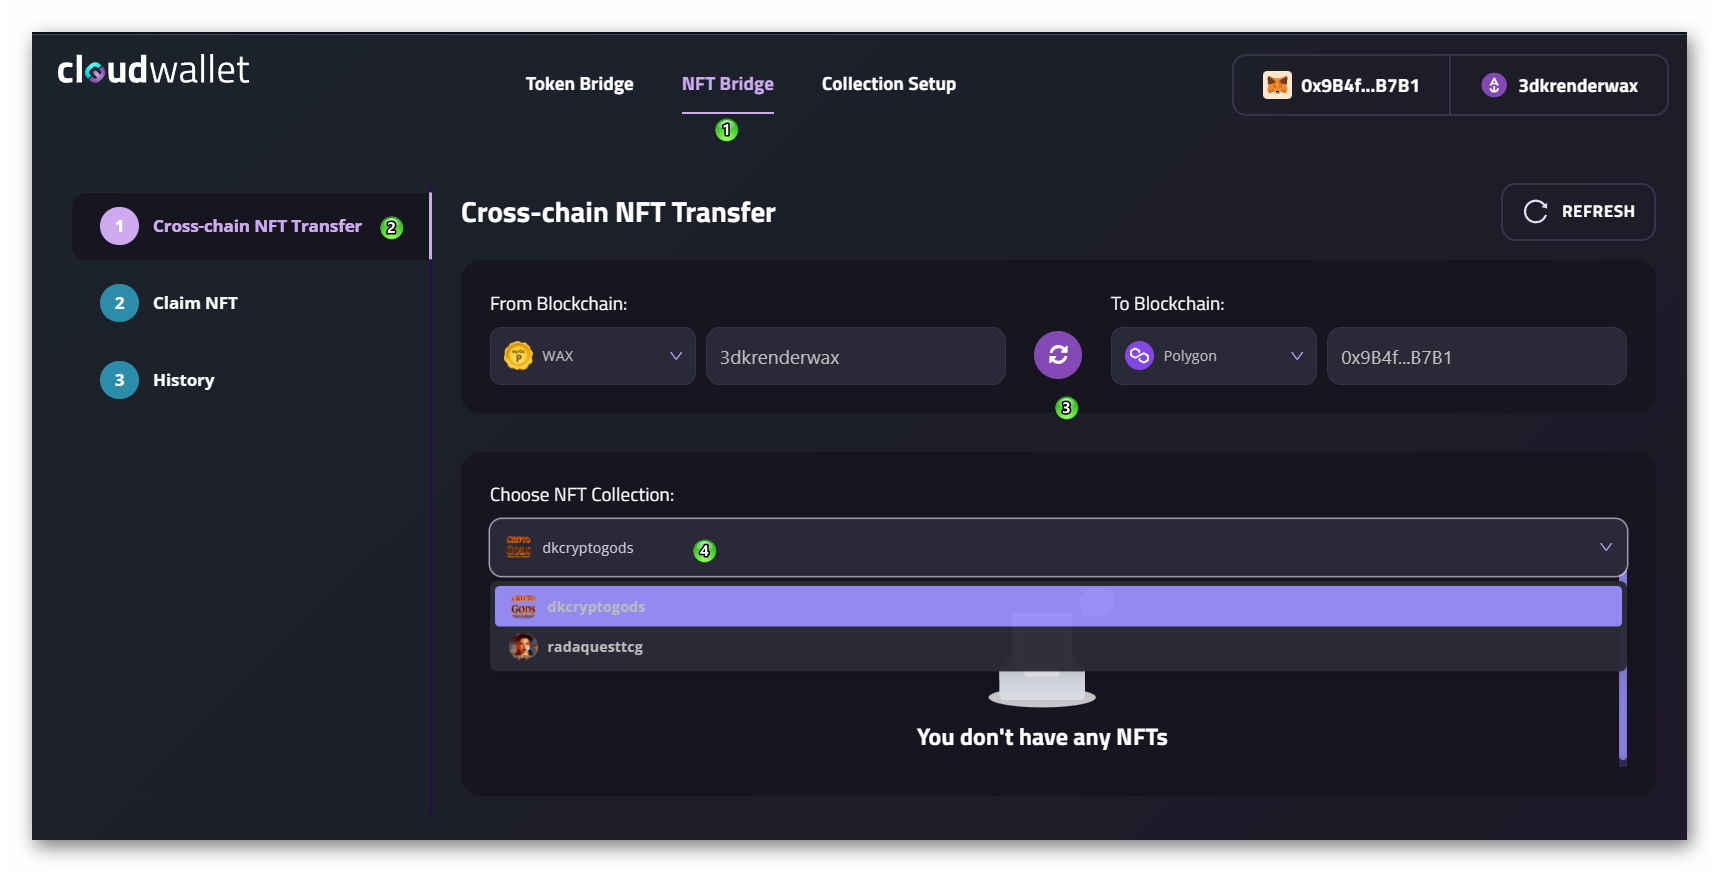
- Ensure that the source and destination chains are correctly selected (3)
- If we have NFTs from more than one collection with the bridge active in our Wallet, we will need to select the collection we will work with. Note: In the screenshot, two collections appear: ‘cryptogodsdk’ owned by the wallet ‘3dkrenderwax’, and ‘radaquesttcg’ owned by the wallet with the same name ‘radaquesttcg’. The reason for showing two collections from different owners is to illustrate that to use a bridge, we do not need to own the collection; it is necessary that the owner has previously configured the bridge from the collection’s wallet.
If we have just registered the bridge, it may take some time for the assets to appear. If this happens, click the “Refresh” button to reload the web page. It should show something similar to the following screenshot.
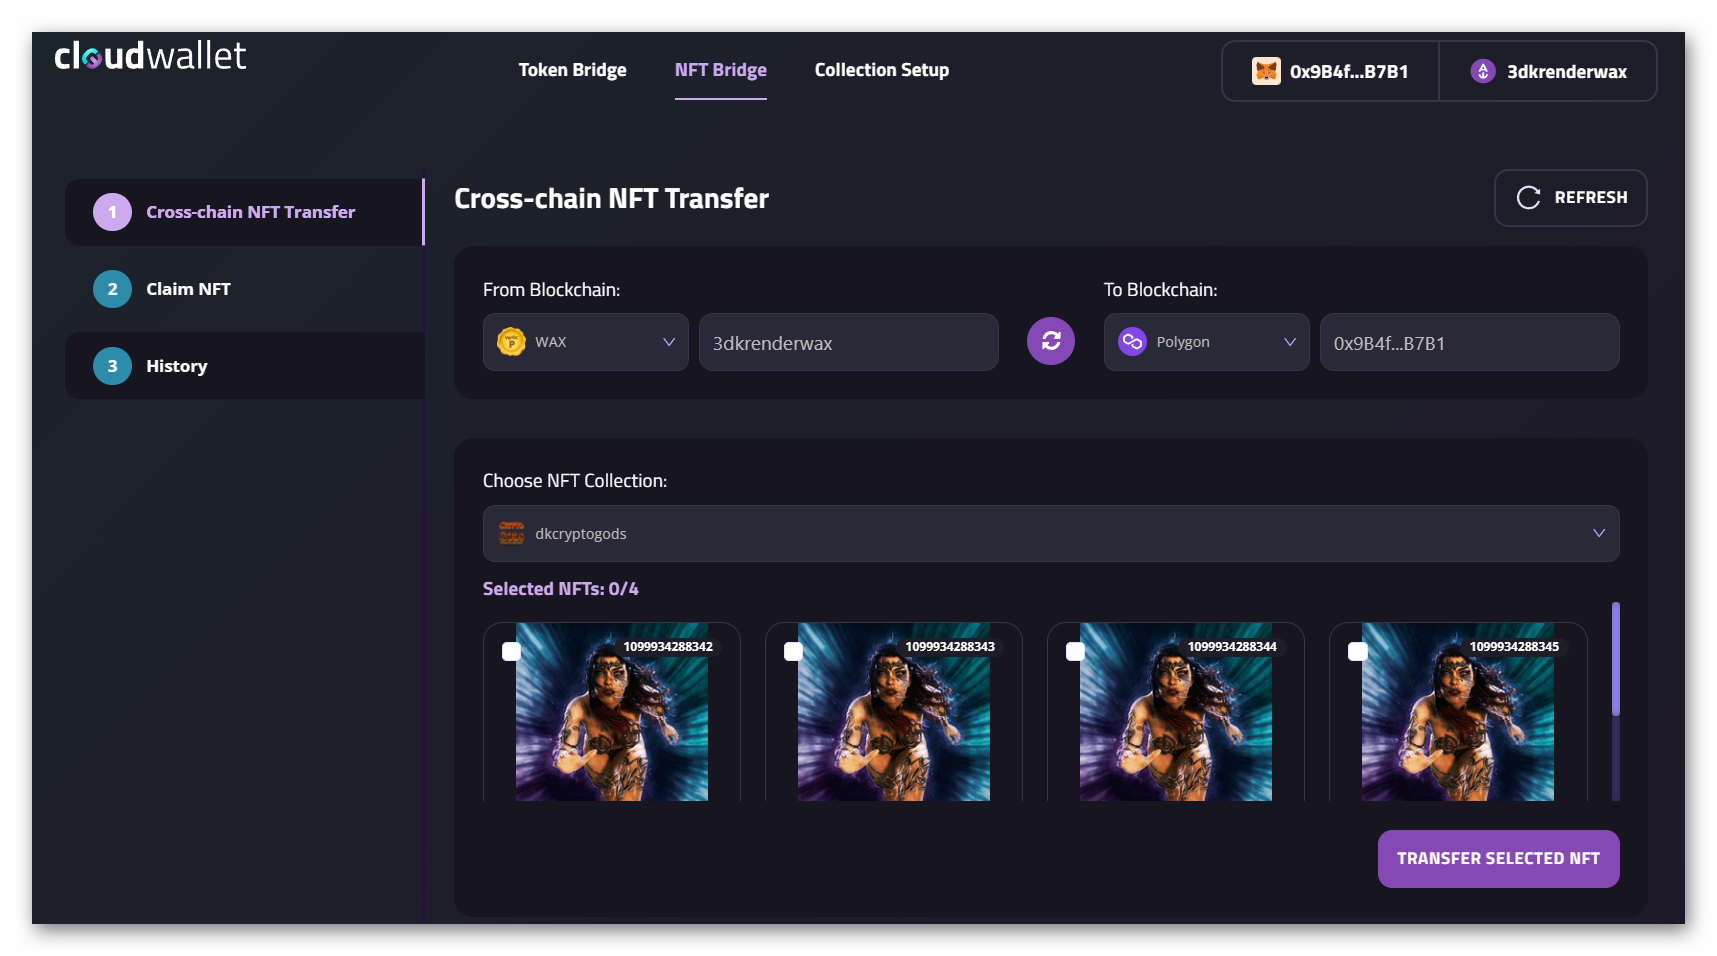
We will select the NFTs we want to transfer to the destination chain and click the “Transfer Selected NFT” button.
We will need to sign a transaction from WAX to send the NFTs to the MyCloudWallet bridge smart contract. This transaction consumes CPU/NET from the WAX wallet.
Claim Transferred NFTs
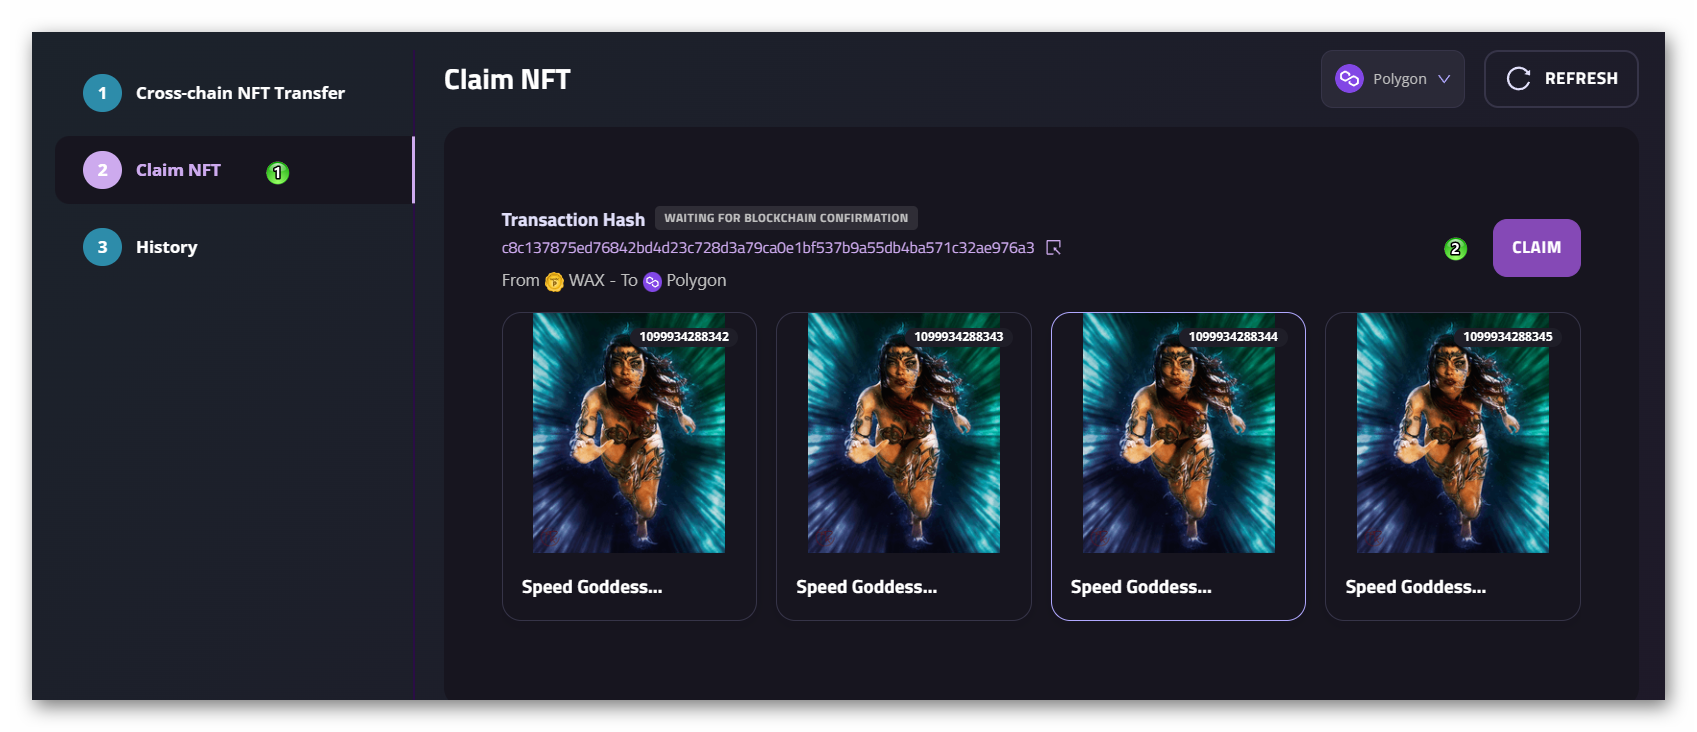
- Switch to the second option in the left menu: Claim NFT
- The NFTs we sent to the bridge from WAX will be displayed. If they do not appear, it may be due to delays in confirmations on the destination chain, as mentioned earlier. It may be necessary to wait a few minutes.
- Click the Claim button to claim the NFTs from the bridge to our wallet on the destination chain; in this case, Polygon. We will now need to sign a transaction with the destination chain wallet and pay the fees (Matic).
And that’s it! We now have our WAX NFTs on Polygon.
To verify, we can go to an NFT market or viewer, such as OpenSea, log in with our wallet, and we will see that the NFTs are in our inventory.
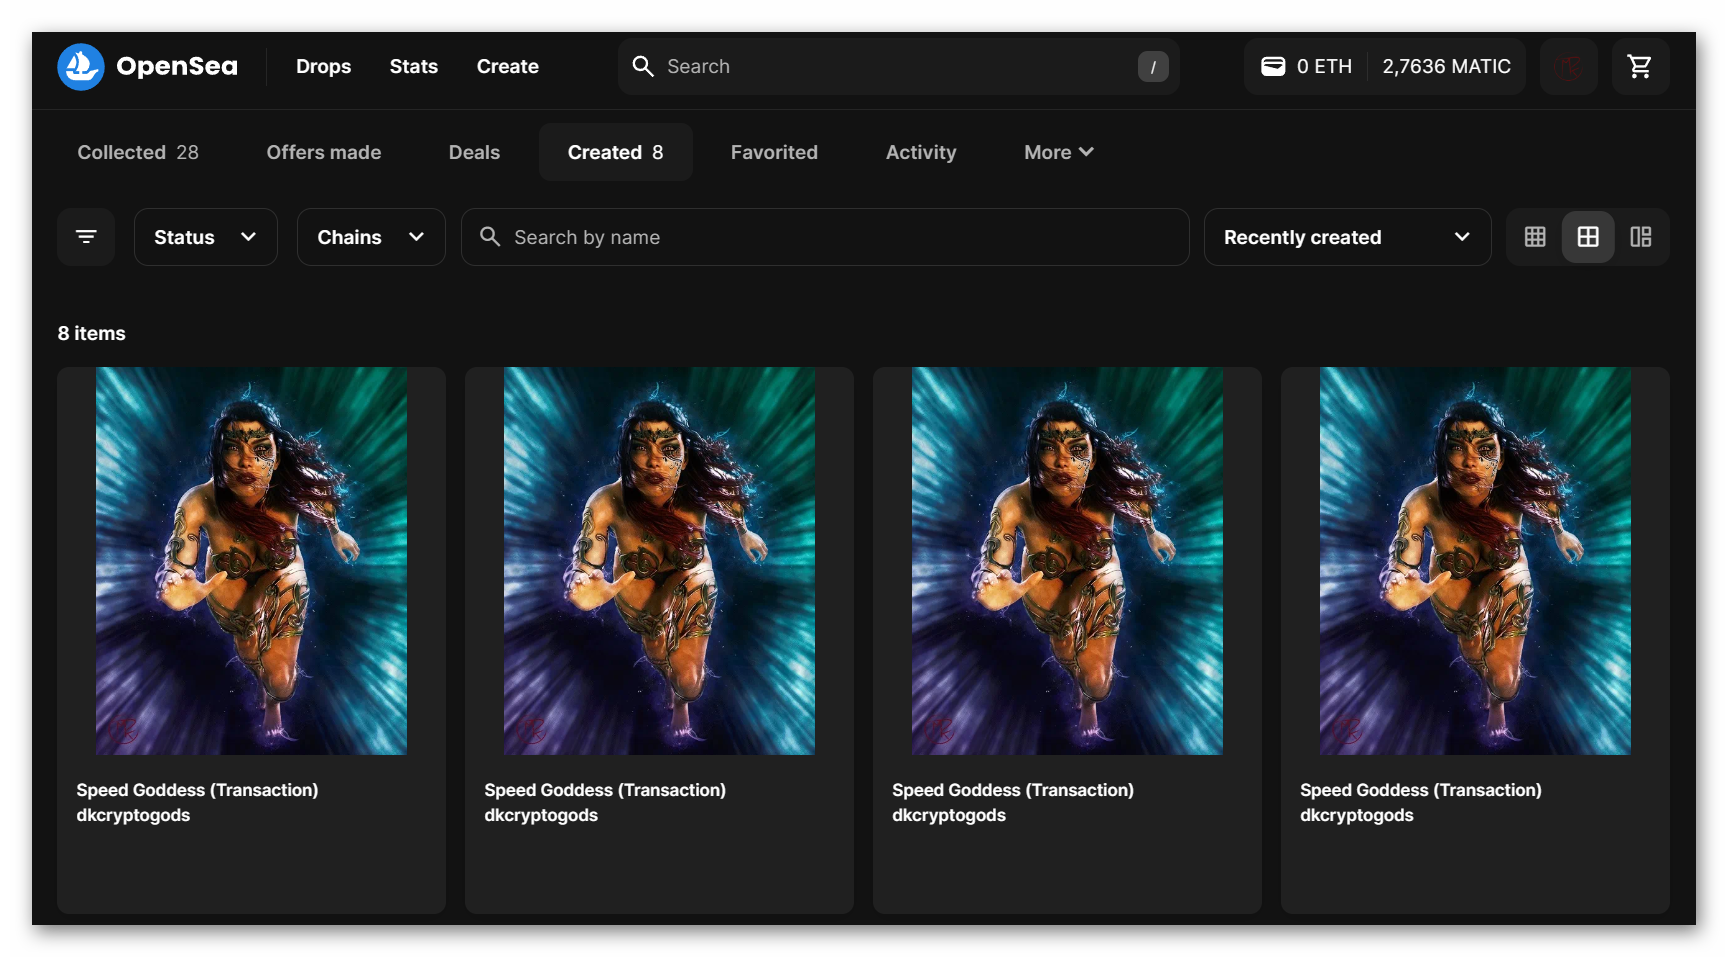
If we click on one of the NFTs, we can see its metadata.
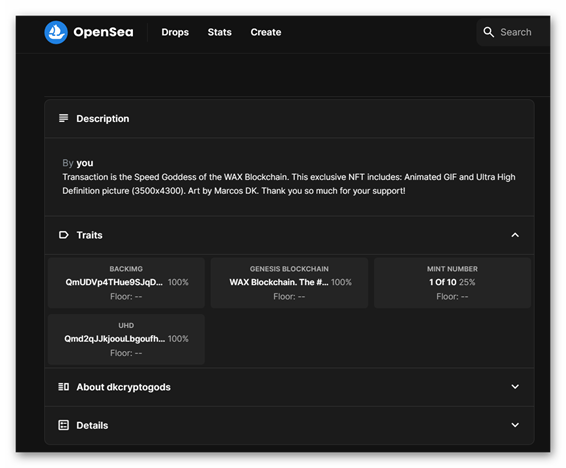
It shows different information, including that the NFT originated on WAX.
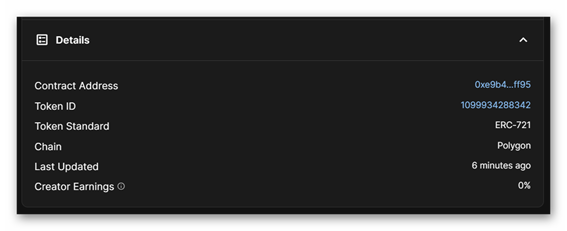
If we click on the “Details” section, we can see the collection’s address (contract address). Knowing this information will be very useful when we want to register a bridge for an original Polygon collection, for example, towards WAX. As we have already mentioned, on EVM, collections have a different smart contract address from the smart contract address of our wallet.
Transfer from Polygon to WAX
To transfer NFTs from Polygon to WAX, the steps are almost the same as for transferring from WAX to Polygon.
- Select NFT Bridge in the top menu (1)
- Select Cross-Chain NFT Transfer in the left menu (2)
- Select Polygon as the source chain and WAX as the destination chain (3)
- Select the NFTs to transfer (4)
- Click on TRANSFER SELECTED NFT (5) We will need to sign a transaction from Polygon, so we need to have Matic to pay the fees.
Once the transaction is confirmed, we will find the NFT in our WAX wallet without needing to claim it.